Having an automatic build process, high grade unit and integration tests and a CI (continuous integration) system helps to enforce a certain level of quality. Runtraction is a Javascript HTML5 based mobile (web) application. It was scaffolded using Yeoman utilizing:
- Yo for scaffolding the intial project structure and additional components,
- Grunt for build automation and
- Bowers dependency management.
The Yo utility creates Karma tests suites beside the source and various other artifacts. Karma integrates well with several CI products like Jenkins CI and Travis CI. Travis CI provides a free continuous integration service and pthe integration into an own project is just a matter of adding an appropriate .travis.yml configuration file.
The Runtraction source code lives at Bitbucket.
So everything seems to be fine – but unfortunately Travis CI is very tightened to Github so it is not possible to use it from Bitbucket directly. Furthermore there is no service trigger for Tavis CI in Bitbucket too.
The good news is that Karma as well as Bitbucket have support for Jenkins CI – the bad one is that you have to find either some public available Jenkins server or host one by yourself. That is where Cloudbees comes into play. Cloudbees provide various cloud and PAAS (Platform As A Sevice) services including a free limited access to a preconfigured Jenkins CI installation under the label „DEV@Cloud“. Firing up a Jenkins server is just one click away. In addition Cloudbees offers an deployment on their cloud hosting systems as well.
Cloud based Jenkins CI service
Create your Jenkins CI service
Instead of starting from the scratch you can search for preconfigured installation images called ‚Clickstart‘ in Cloudbees terminology. After the registration process you can create your Jenkins service, this will kickstart your plain Jenkins instance at Cloudbees.
Create your integration build
The presented configuration here is inherited from the Javascript Angular Jenkins Clickstart which is available from Github.
Grunt is used for building the app and Karma the test runner in charge. The Jenkins build process description consists of the following steps:
- CloudBees DEV@cloud Authorization
- Advanced Project Options
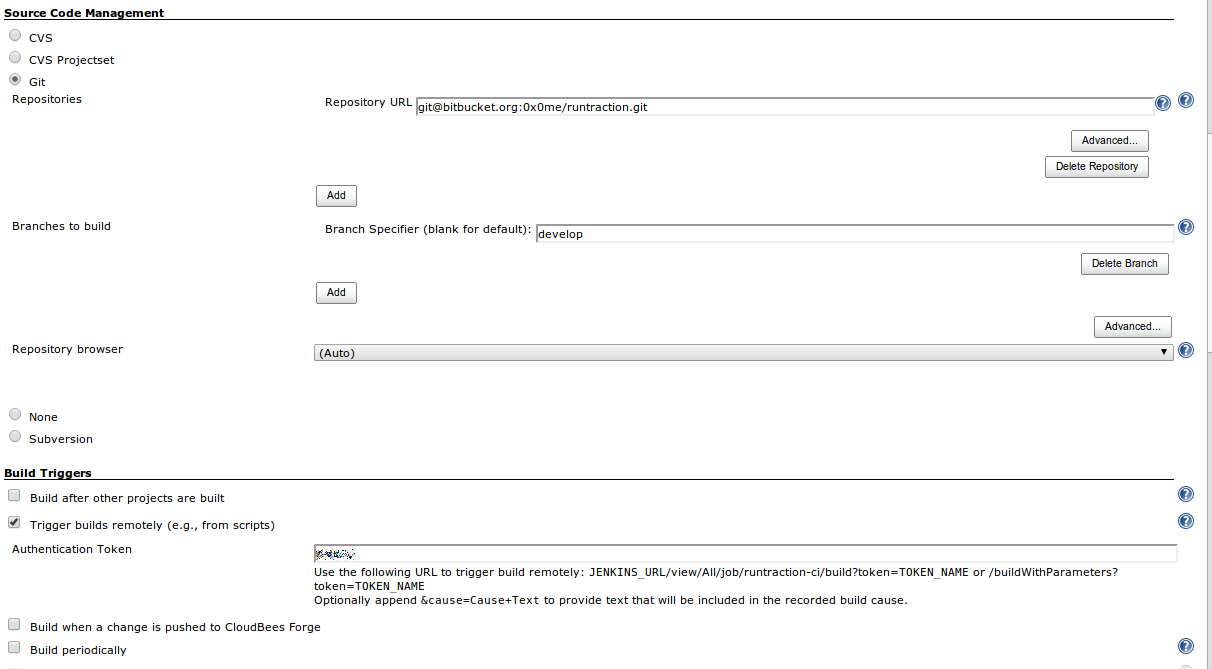
- Source Code Management
- Build Triggers
- Build Environment
- Build
- Execute shell
- Post-build Actions
- Publish JUnit test report
Beside some common settings you can play around you should take care on the following settings to foster the integration with your Bitbucket project:
- Choose Git Repositories and enter your repository information. You can copy it from your Bitbucket site – make sure that you have choosen ‚SSH‘ beforehand. Optionally you can restrict your build to certain branches only.
- Setup you Build Trigger to be remotely triggered and enter some distinct token. This token will be used if you integrate the Jenkins CI server as service in your Bitbucket setup.
Setup build instructions
The execution of the Grunt based build and test utilizes an ‚execute shell‘ build step. The given shell script downloads and extracts a customized Node.JS archive. Afterwards it set up the environment and installs the required pre-build dependencies. This includes the installation of an appropriate Grunt environment as well as the installation of Phantom.JS a headless javascript browser implementation used by Karma unit and end-to-end (e2e) tests. The initialization of the build environment is finished by downloading the build and runtime dependencies based upon the projects ‚component.json‚ (used by Bower) and ‚package.json‚ (used by NPM) declarations. Finally the tests are executed by invoking ‚npm test‚.
node_version=0.10.5

if [ ! -e nodejs-plugin-$node_version.zip ]
then
    wget https://s3.amazonaws.com/clickstacks/admin/nodejs-plugin-$node_version.zip
    unzip nodejs-plugin-$node_version.zip
    tar xf node.tar.gz
    mv node-v* node_lib
fi

rm -rf target
mkdir target

export PATH=$PATH:$WORKSPACE/node_lib/bin

#cd app
npm install
npm install grunt grunt-cli
npm install phantomjs

export PATH=./node_modules/grunt-cli/bin/:./node_modules/bower/bin:./node_modules/phantomjs/bin:$PATH

bower update && bower install

npm test
Publishing the test result
For viewing the test result the post build step ‚Publish JUnit test result report‘ is added and configure to point to the test result file (eg. ‚test-results.xml‚).
Integrate the CI service with Bitbucket
There is an excellent documentation on Cloudbees on integrating the Cloudbees CI integrations service with the Bitbucket SCM available at the developer resources. Take care that you use the same token as specified in your CI build settings (see above). It is important to enter the appropriate endpoint address, especially it is required to quote your Cloudbees login name correctly (eg. replacing the ‚@ character by ‚%40‚).
Prepare the source
For running the integration build flawless it is necessary to ensure that all build and runtime dependencies are included. Furthermore there has to be a test target provided by the npm configuration file ‚package.json‚ (see line 32-34):
{
  "name": "runtraction",
  "version": "0.0.0",
  "dependencies": {},
  "devDependencies": {
    "grunt": "~0.4.1",
    "grunt-contrib-copy": "~0.4.0",
    "grunt-contrib-concat": "~0.1.3",
    "grunt-contrib-coffee": "~0.6.4",
    "grunt-contrib-uglify": "~0.2.0",
    "grunt-contrib-compass": "~0.1.3",
    "grunt-contrib-jshint": "~0.3.0",
    "grunt-contrib-cssmin": "~0.5.0",
    "grunt-contrib-connect": "~0.2.0",
    "grunt-contrib-clean": "~0.4.0",
    "grunt-contrib-htmlmin": "~0.1.1",
    "grunt-contrib-imagemin": "~0.1.2",
    "grunt-contrib-livereload": "~0.1.2",
    "grunt-bower-requirejs": "~0.4.1",
    "grunt-usemin": "~0.1.10",
    "grunt-regarde": "~0.1.1",
    "grunt-rev": "~0.1.0",
    "grunt-karma": "~0.3.0",
    "grunt-open": "~0.2.0",
    "matchdep": "~0.1.1",
    "grunt-google-cdn": "~0.1.1",
    "grunt-ngmin": "~0.0.2"
  },
  "engines": {
    "node": ">=0.8.0"
  },
 "scripts": {
   "test": "grunt test --force"
  },
  "repository" : {
	"type" : "git",
	"url" : "https://0x0me@bitbucket.org/0x0me/runtraction.git"
  }
}
Committing (and pushing) the change the build on the CI server should be triggered as well and the test result should be available choosing ‚Test Results‘ on the left after selecting the executed build.
Add a build indicator
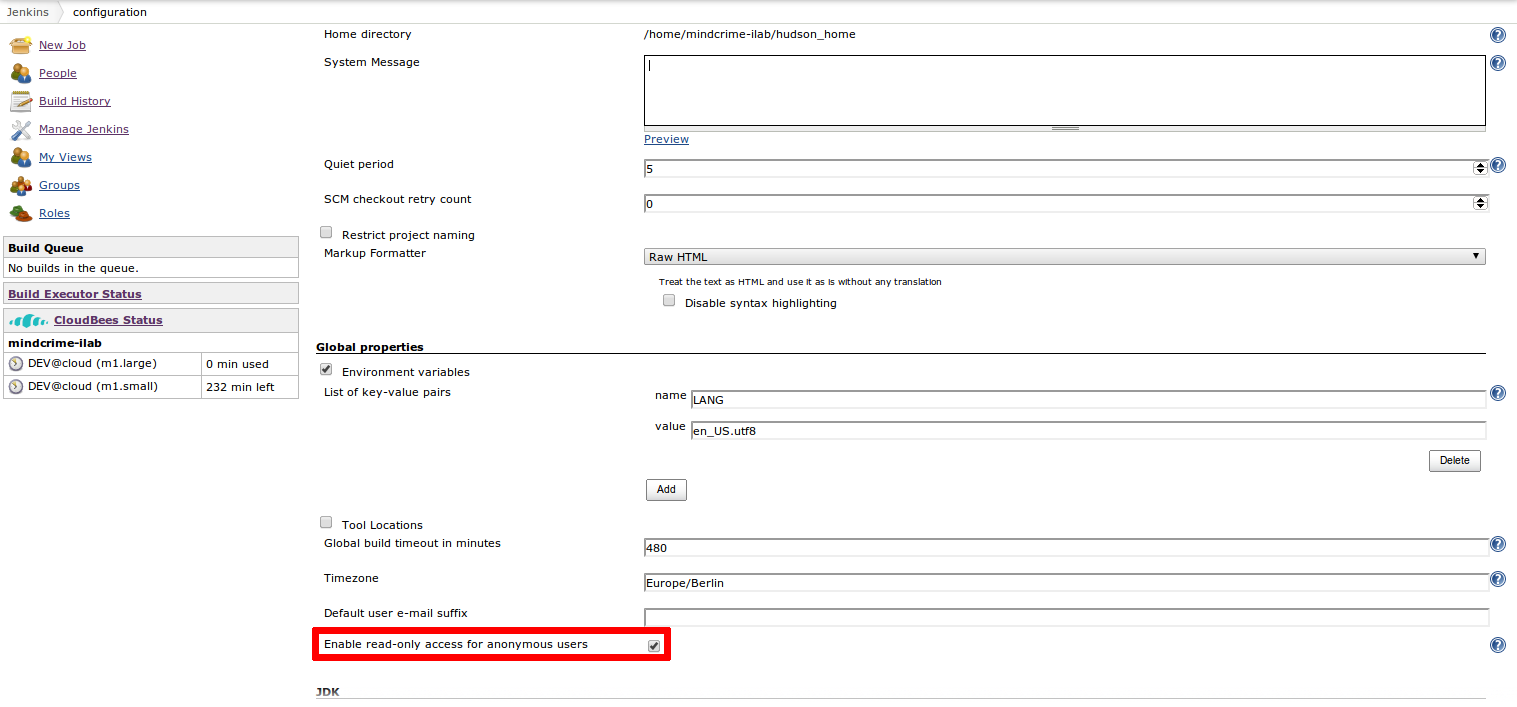
To include a build indicator to the project, SCM or wikipage install the ‚Embeddable Build Status‘ Plugin. This can be easily done using Jenkins own configuration mechanism. The plugin install page could be found under ‚Jenkins->Manage Jenkins->Manage Plugins‚.Choose the tab ‚Available‘ and select the desired plugin. After a restart the plugin will be accessible on your build page. The free CI service from Cloudbees has restricted access to authorized users only. To make the build status publicly visible change to ‚Jenkins->Manage Jenkins->Configure System‚ and enable the checkbox ‚Enable read-only access for anonymous users‚:
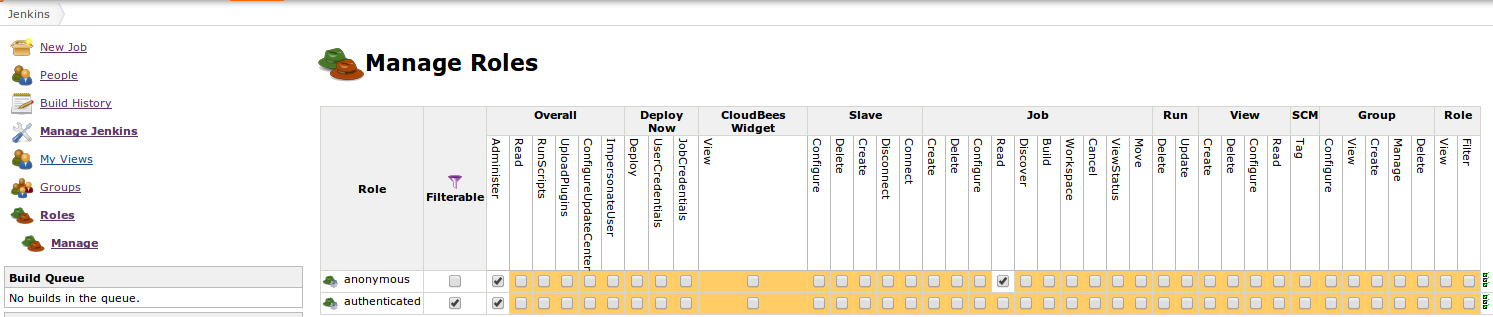
Finally change to ‚Jenkins->Roles->Manage‚ and set at least the following read permissions for anonymous:
To include the build status indicator on any page change to the build and select ‚Embeddable Build Status‚ and copy the appropriate url for inserting an image reference to the build status.
Credits for the Jenkins logo published under Creative Commons Attribution-ShareAlike 3.0 Unported License go to http://jenkins-ci.org.