Kategorien
Allgemein

Fixing Aftershot Pro 2 X64 update dialog on ubuntu 14.04

Aftershot Pro X64 starts with an information dialog that there is a new version available, but after hitting on the given links nothing happens. Starting Aftershot from the command line shows up that there is some problem with the Mozilla XUL library and the Aftershot provided libstdc++.so.6 lib. Instead of using the system default library, it relies on the delivered version. This could be easily fixed by removing any read access right on the symbolic link target:

cd /opt/AfterShotPro2\(64-bit\)/lib
chmod -r libstdc++.so.6*

Afterwards the links are working and refer to the download location for the new version.

Kategorien
Allgemein Book Review Scala

Book Review|Scala for Java Developers

Thanks to Packt Publishing I have got a free ebook copy of „Scala for Java Developers„.

Preface

All Java code samples are covered by the features of the Java language specification whereas the upcoming functional extensions of Java 8 are not part of the discourse.

Review / Summary

The book “Scala for Java Developers” by Thomas Alexandre is an introduction to the Scala language from a Java Developers perspective. It does not explain basic programming paradigms like object orientation beside a very small wrap up of the functional paradigm as it might not be well known to every Java coder. The book is organized into 10 sections which should be read in order and mostly build upon each other.

Kategorien
AngularJS CoffeeScript Dev Note

DEV-NOTES|AngularJS: Global fault handler

„Dev Notes“ is a small column about practical hints on certain problems or solutions taken from real world applications.

AngularJS is a great framework simplifying the development of JavaScript applications. The following example shows how to setup a global error handler to notify the user about the applications state.

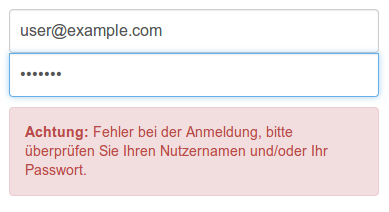
fault-handler_sampleTo benefit from angulars super powers the global fault handler part visible to the user is encapsulated into an angular directive which is an easy but powerful way to enhance the HTML tag cloud with your own components. Building the handler involves roughly the following steps:

Note: For those who are not fluent in CoffeeScript the code can be ‚compiled‘ to JavaScript on the CoffeeScript homepage using the ‚Try CoffeeScript‘ tab.

  1. Add global fault handler and clear method
    app.run ($rootScope, $log) ->
      ###
      # fault handler
      ###
      $rootScope.faultHandler = (data) ->
        $log.debug "[faultHandler] error data[#{data}]"
        # handle and process error data here
        # assign error message to global fault message
        $rootScope = "ERROR: #{data}"
    
      ###
      # clear fault
      ###
      $rootScope.clearFault = () ->
        $log.debug "[faultHandler] clearing fault[#{$rootScope.errorMessage}]"
        $rootScope.errorMessage = undefined
    
  2. Create custom tag to include the error handler
    'use strict'
    
    angular.module('myApp')
      .directive('errorMessages', () ->
        template: "<div class='alert alert-danger' data-ng-show='errorMessage'><strong>Achtung:&nbsp;</strong><span data-ng-bind='errorMessage'></span></div>"
        restrict: 'E'
      )
    
    
  3. Refer to fault handler
    'use strict'
    
    angular.module('myApp')
    .controller 'UserprofilCtrl', ($scope, $rootScope, $log, UserProfilService) ->
        $scope.profil = $rootScope.user
    
        # query userprofile by UID
        result = UserProfilService.get({id: $scope.profil.uid})
    
        result.$promise.then (profil) ->
          $scope.profil = profil
          $rootScope.clearFault()
        .catch $rootScope.faultHandler
    
  4. Use it
    <!-- include the following place holder tag into your page -->
    <x-error-messages></x-error-messages>
    
Kategorien
Allgemein Quick Tip Sonarqube

Quick tip: Running Sonarqube on a Synology Diskstation DS214play

The Synology Diskstation DS214play is an Intel based NAS device with 1GB of RAM. It provides a MariaDB and Java support nearly out of the box, both packages are installable using the systems own package manager.

Sonarqube is an ‚continuous inspection‘ formulator providing insights in your code and assuring quality metrics. It is an open platform for managing your code quality which could be enhanced by various plugins for different languages, code metrics and reports.

To install Sonarqube on the DS214play just download thelatest release (at time of writing 4.1.2) from the Sonarqube homepage and unzip it to a directory of your choice on the diskstation. Basically it is possible to run Sonarqube from that point, but it will yield some error messages due to the fact that the diskstation system supports only subset of the command options of a full flavored UNIX installation.

To get Sonarqube started with out error messages inside the gitpid function the pidtest expression must be replaced as shown in the following fragment (new version at line 19):

getpid() {
    if [ -f "$PIDFILE" ]
    then
        if [ -r "$PIDFILE" ]
        then
            pid=`cat "$PIDFILE"`
            if [ "X$pid" != "X" ]
            then
                # It is possible that 'a' process with the pid exists but that it is not the
                #  correct process.  This can happen in a number of cases, but the most
                #  common is during system startup after an unclean shutdown.
                # The ps statement below looks for the specific wrapper command running as
                #  the pid.  If it is not found then the pid file is considered to be stale.
                
                # not supported by the diskstation environment
                #pidtest=`$PSEXE -p $pid -o args | grep "$WRAPPER_CMD" | tail -1`
                
                # trying instead:
                pidtest=`$PSEXE | grep $pid | awk '{print($5)}' | grep "$WRAPPER_CMD" | tail -1`
                
                if [ "X$pidtest" = "X" ]
                then
                    # This is a stale pid file.
                    rm -f "$PIDFILE"
                    echo "Removed stale pid file: $PIDFILE"
                    pid=""
                fi
            fi
        else
            echo "Cannot read $PIDFILE."
            exit 1
        fi
    fi
}

Sonarqube should startup without any annoyance now, but the stop call will still complain. To fix this to it is needed to replace the second call to the ps command as well (new version at line 6):

testpid() {
	# diskstation cannot even handle the following command
    #pid=`$PSEXE -p $pid | grep $pid | grep -v grep | awk '{print $1}' | tail -1`
    
    #therefore replace with
    pid=`$PSEXE | grep $pid | grep -v grep | awk '{print $1}' | tail -1`
    
    if [ "X$pid" = "X" ]
    then
        # Process is gone so remove the pid file.
        rm -f "$PIDFILE"
        pid=""
    fi
}

Starting and stopping Sonarqube should now work like a charm and you can focus on the insights of your code.
Kategorien
C++ Frameworks Programming Languages QtTestLib

Creating class level xunit report files with QtTestLib

Working on my new project SynPlayer – an controller to the Synology AudioStation based on C++ and Qt – it becomes evident to set up a testing infrastructure. Keeping dependency small and simple the decision was to facilitate QtTestLib for testing purposes.

Kategorien
Gradle Quick Tip Scala

Deliver code coverage indices for Scala using Gradle and SCCT

This post is a kind of follow up post to Gradle rocking Scala Specs2 tests. After setting up the build supporting Specs2 tests we could take it a step further to provide information about the code coverage of the tests.

SCCT is a code coverage tool for Scala. One benefit of SCCT is that the output format is compliant, to the widely known Cobertura so it could easily integrated into Jenkins for example.

Kategorien
Gradle Programming Languages Quick Tip Scala

Gradle rocking scala specs2 tests

In preparation of the upcoming Coursera course „Reactive Programming“ I just want to refresh my Scala skills by porting the Coursera Downloader from Python to Scala.

Setting up the initial build with Gradle is quite easy using the Scala Plugin. Looking around for some testing framework I have chosen Specs2 . Running Gradle after building some simple unit tests shows up that the tests are not executed at all. The build passes without running one single tests. Even declaring the tests to be processed by a JUnit4 runner did not want show up a single tests result. So I came up with the following simple solution. I add a new specs2 task to my Gradle build using the specs2 file runner:

/**
 * Run Spec2 tests
 */
task specs(type: JavaExec, dependsOn: testClasses) {
    main = 'org.specs2.files'
    args = ['console']
    classpath sourceSets.main.runtimeClasspath
    classpath sourceSets.test.runtimeClasspath
    classpath configurations.testRuntime
    classpath configurations.runtime
}

The file runner will select all files matching .*Spec in the test source directory which default (src/test/scala) nicely conforms the default project setup. If necessary it could be adjusted by setting the specs2.srcTestDir system property. For more information on the Specs2 Runners refer to the Specs2 documentation.

Now you have only to hook in the test step execution which could be easily achieved by extending the test task to depend on the specs2 tasks as well:

/*
 * and  add them to the default test set
 */
test.dependsOn specs

Running the test target of the Gradle build once again shows up the execution of the specs2 target and all tests and specifications.

Update(09/04/2014)

Marino Borra points out that he could run the specs tests successfully with the default gradle test task by simply adding the @RunWith(classOf[JUnitRunner]) annotation.

Kategorien
Allgemein Continous Integration Javascript Jenkins

Krama, Jenkins and Bitbucket colluding continuous integration

Having an automatic build process, high grade unit and integration tests and a CI (continuous integration) system helps to enforce a certain level of quality. Runtraction is a Javascript HTML5 based mobile (web) application. It was scaffolded using Yeoman utilizing:

  • Yo for scaffolding the intial project structure and additional components,
  • Grunt for build automation and
  • Bowers dependency management.

The Yo utility creates Karma tests suites beside the source and various other artifacts. Karma integrates well with several CI products like Jenkins CI and Travis CI. Travis CI provides a free continuous integration service and pthe integration into an own project is just a matter of adding an appropriate .travis.yml configuration file.

The Runtraction source code lives at Bitbucket.

So everything seems to be fine – but unfortunately Travis CI is very tightened to Github so it is not possible to use it from Bitbucket directly. Furthermore there is no service trigger for Tavis CI in Bitbucket too.

Kategorien
HTML5 Javascript Programming Languages

Building a simple battery status indicator with the W3C Battery API and HTML5 Canvas

Sometime ago I have been stumbled upon a demonstration of Firefox OS. There was said that most applications in Firefox OS are build from HTML5 and Javascript even the more hardware related ones like a battery indicator. Furthermore they pointed out that some of the Firefox OS API become available in Mozilla Firefox browser too. The Battery API is one of those – already available – APIs and it is becoming standardized by the W3C too. This was an inspiration to play around with the that API and build a simple web based battery status indicator relying on HTML5 Canvas, Javascript and the Battery API. You can view the result here.

Kategorien
Allgemein

DIY: Replace Google Reader by Tiny Tiny RSS

After Google announcing the end of service date for Google Reader the question arises where to move next. Once again back to Bloglines – that is the service which was said to be dead, but ironically it survived Google Reader or choose one of the numerous other alternatives (eq. Feedly or GoodNoows) which are worth to take a look at them. But you might running in the same trap again – they could be closed for whatever reasons. So I searched for an open source and shared-hosting friendly replacement and I will give Tiny Tiny RSS a try.

The setup procedure is quite easy, download the distribution, unpack it and follow the installation instructions. Afterwards you should be able to login to you Tiny Tiny RSS installation but there where some strange errors I got rid of by using the latest index.php file from the github repository and upgrading the php version to 5.4 .